The goal of any subwoofer is to deliver the lowest octaves of music with the least amount of distortion possible at sound pressure levels that match those of the rest of the system.
Since my Martin Logan rig can play very clean at SPL's greater than 105dB, I need low frequency reproduction that can keep up and pressurize the 3K cubic foot home theater.
While I had two Velodyne ULD-18's in my home theater before, they could not move enough air to keep up. Which brings me to the main point of all great subs: they have to displace air in significant quantities.
Most commercial subs have relatively small volumetric displacements, and I'll use the rather large ULD-18 here for comparison, which displaces a total of 2.15 liters (or 131 ci). In contrast, my IB sub displaces 15.24 liters (or 870 cubic inches), which 6.5 times as much one Velodyne.
The other characteristic of Infinite Baffle subs is that they have very low distortion figures due to operating many drivers in their cleanest ranges and not forcing them to compress air in a box. This IB is the perfect match for the ultra-low distortion Martin Logan electrostats.
I innovated a design for in-room manifolds (called an 'outie') with this particular design, as can be read in the install story below.
The system specifications are:
System Frequency Response
18 - 120 Hz +/-2dB
Crossover Frequency
80 Hz at 24 dB per octave
In-Room manifold IB design, opening to 3,500 CuFt below HT
Sensitivity
92dB/1 watt/meter
Amplifier
Sunfire Cinema Grand. - 400x2 into 4 ohms = 800 watts total to IB (more than enough to reach xmax)
Drivers
Stryke AV15 Mk-II
Impedance
2 drivers series wired on one VC to yield 4 ohms, with each pair wired to one amp channel
Construction
Dual layers of 16-ply Baltic-Birch plywood
Glued and screwed together. Glued and screwed to floor
Weight (drivers + Box): 40 lbs (not that it matters, as it's bolted and glued to the floor now)
Information on IBs:
IB Install Story
[Circa 2005] In my decent-sized home theater (26 x 16 x 10), I used to run 2x Velodyne ULD-18s as my subs. These were very good subs with low distortion (my main criteria for ‘good’). However, they did not play quite loud enough to keep up with my Martin Logan Electrostats (big Monoliths III’s in the front). Also, after 12 years with them, I wanted something new.
This led to investigating subs and sub options, eventually leading me to the ‘Cult of the Infinitely baffled’ site, which led to a conversion (thanks Thomas).
Having gotten IB ‘religion’, I investigated how to set one up. Turns out I have a perfect setup, as the region beneath that large HT (plus another 6’ beneath the equipment room) is a large open crawl space/ storage room with about 3,800 cubic feet of air space. No problemo for an IB venting into that ;-)
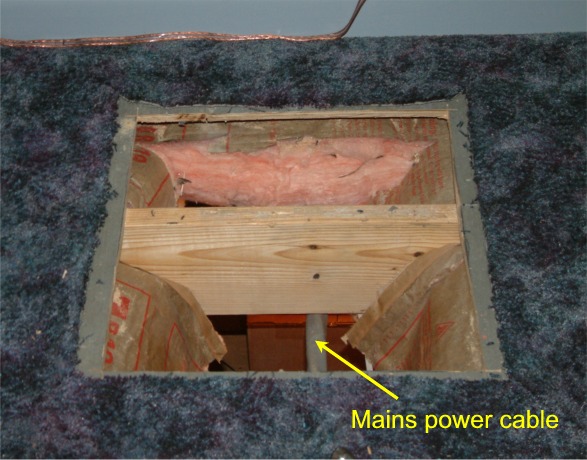
Hole in the floor
The big problem is that the ideal location for the manifold is the front/middle of the room, which also happens to be where the home's main power feeds (two huge 200amp service feeds) run right under that spot of the floor, as can be seen here on the left.
This led to a brainstorming session that said an IB manifold can also work in reverse, so have the box with the drivers in the room and vent the manifold through the floor. This would wind up looking like a ‘normal’ sub box, albeit one with four drivers facing out of it on each side ;-)
After a few exchanges with the members of the ‘Cult of the Infinitely Baffled’ forum (thanks guys), it was established that it ‘should’ work in theory.
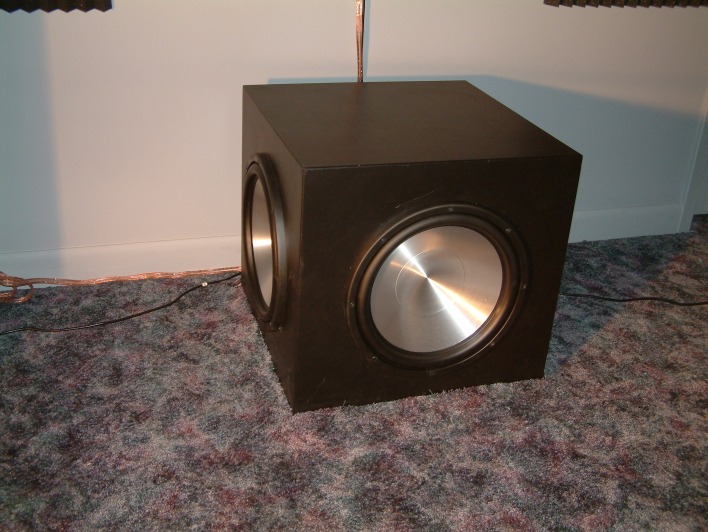
I selected four Stryke AV15 Mk-II drivers as the ideal candidates, these 15” beauties have excellent characteristics for IB use (long xMax) and solid looking motors. An aluminum cone sounded like a good thing to have between the HT and the crawl space. Not many worries about humidity with aluminum ;-)
Then comes the box. As the IB cognoscenti out there know, dimensions aren’t too critical with IBs, so with the help of a friend (thanks Eric), we settled on a 20” internal diameter (22” external) cube made up of two layers of 16 ply 3/4 Birch plywood glued and screwed together to make an inch and a half thick box that is rock solid. My friend used 2 pounds of screws and 16 ounces of glue assembling this thing. Never seen a speaker box that strong…
Using his shop full of excellent tools, he cut perfect holes for the drivers and added a bottom flange so attachment to the floor would be straightforward and secure.
Here's the raw box, painted and ready for speakers and mounting:

Here's the raw box, painted and ready for speakers and mounting:

And here you can see the flange so we can secure the box to floor with screws:

Next is the install. Again, my friend Eric comes to the rescue, armed with all kinds of cool tools to help install the box into the HT.
Having already selected the spot based on computer modeling and in-room ETF analysis and one of my Velodynes, we marked off the region on the carpet where we would cut open the floor. Here's the test fitting of the box over the hole:
After carpet cutting and sawing out the sub floor in a 20” square at the location, we found that, as expected, at least one joist would be running across the opening. Not a problem acoustically, but we did want to finish this off with flair, so we built an air deflector for the top of the joist (facing into the box), so there would be no turbulence created at that junction, as seen here:
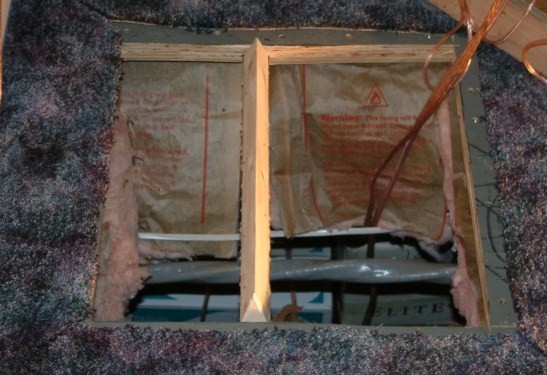
Air deflector
Air Deflector
Installing the drivers into the box presented a choice: Install facing into the box (as is usual for under-floor manifolds) or put them in the box facing out (as typical for regular sub boxes). I chose to mount them facing out, as we had built a sufficiently large box, so there would be no internal interference. I sensed that the air volume was still large enough that no untoward noises would be generated. So far, this has proven to be true. This also improves the in-room look of the IB, as it does look like any other large sub box, but with more drivers.
To secure the drivers in the box, my friend recommended doing this right and we chose to use fasteners, with t-nuts on the inside of the box, and machine screws from the front. Eric’s suggestion of a dab of blue Loctite to keep them from vibrating out is good advice.

Speakers Loaded
Now that the hole was cut and the box loaded up with drivers, we gave it a quick test to check wiring and the drivers. Everything was fine. Mondo output so far…

Test Drive
Installing it into the floor was a piece of cake. Eric, in his usual meticulous way, measured out a screw pattern for the flange, making sure it did not interfere with the screws he had added to the sub-floor reinforcements he had also put in (belt and suspenders stuff), then drilled out the screw pattern from the back of the flange, drilled counter-sinks for the heads on the top side and then we were set to drop it in.
We put down a bead of Liquid Nails to give both an air tight bond and to kill even the remotest possibility of a rattle, then dropped the box over the hole and screwed it down.

Installed
The wiring is pretty straightforward. I used one voice coil per driver (the AV15 is a Dual Voice Coil, with each VC having a 2ohm load). To give the amp a 4 ohm load per pair of drivers, I series connected each pair to each channel. Using a Sunfire Cinema Grand, I get 400 watts per channel into 4 ohms, or a total of 800 watts for the entire IB. This is way more than enough to push these drivers to xMax.
So, how does it sound, you ask? It is awesome, simply awesome. Even before tweaking the parametric EQs, the thing just floored me with how clean it sounds. I played the new Sting album (in SACD), and you could just feel the texture of each bass note. The extension was also impressive (but my Velo’s also went deep).
The room gets pressurized now on the really low notes. This sensation was rarely felt with the previous subs. I attribute that to the IB's higher SPL capabilities at low frequencies.
Now that it’s all tuned and EQ’d, it is fantastic. It is so clean and so powerful. I had no idea a sub could deliver this level of performance, much less at this price point.
The bass quality is the best I’ve ever heard, and the distortion is ultra-low (the combo of Sub and center channel measures under 0.6% distortion at 90dB SPL).
Here is the proof: some measurements of the IB and the companion nine cubic feet sealed 18” sub symmetrically situated at the rear of the room to balance out room modes.

Waterfall dual subs + Left Front
First the Waterfall plot shows the rapid decay thanks to balanced subs, and extensive room treatments. Deep extension into the teens is evident as well.

Dual subs + left front Frequency response
Next is the frequency response, note how flat and even it is:
No wonder the people who build IBs are in a ‘cult’, I’m now ‘cultured’ as well 😉
Final picture shows the custom SL3XC center channel, which is bolted to the IB, so super solid mount:

SL3XC Center channel mounted